raspberry pi
How to Install an Operating System on a Raspberry Pi
You can buy a preloaded SD Card but we are far too cheap for that. We show you a variety of methods to put your chosen operating system onto your Pi for free.
Really handy if you want different setups on the same computer for maybe your personal, work & gaming setup or if you mess up your setup and want to start new with a fresh new clean setup?
- Video Walkthrough
- Best of all worlds - Ubuntu, Retro Pi, Raspbian & more on just 1 Pi
- Inserting the SD card
- Using a Raspberry Pi
- Using a Mac
- Using Windows
- Using the Shell
Video Walkthrough
Best of all worlds - Ubuntu, Retro Pi, Raspbian & more on just 1 Pi
Have you ever wondered if you can have multiple operating systems on one computer like a raspberry pi?
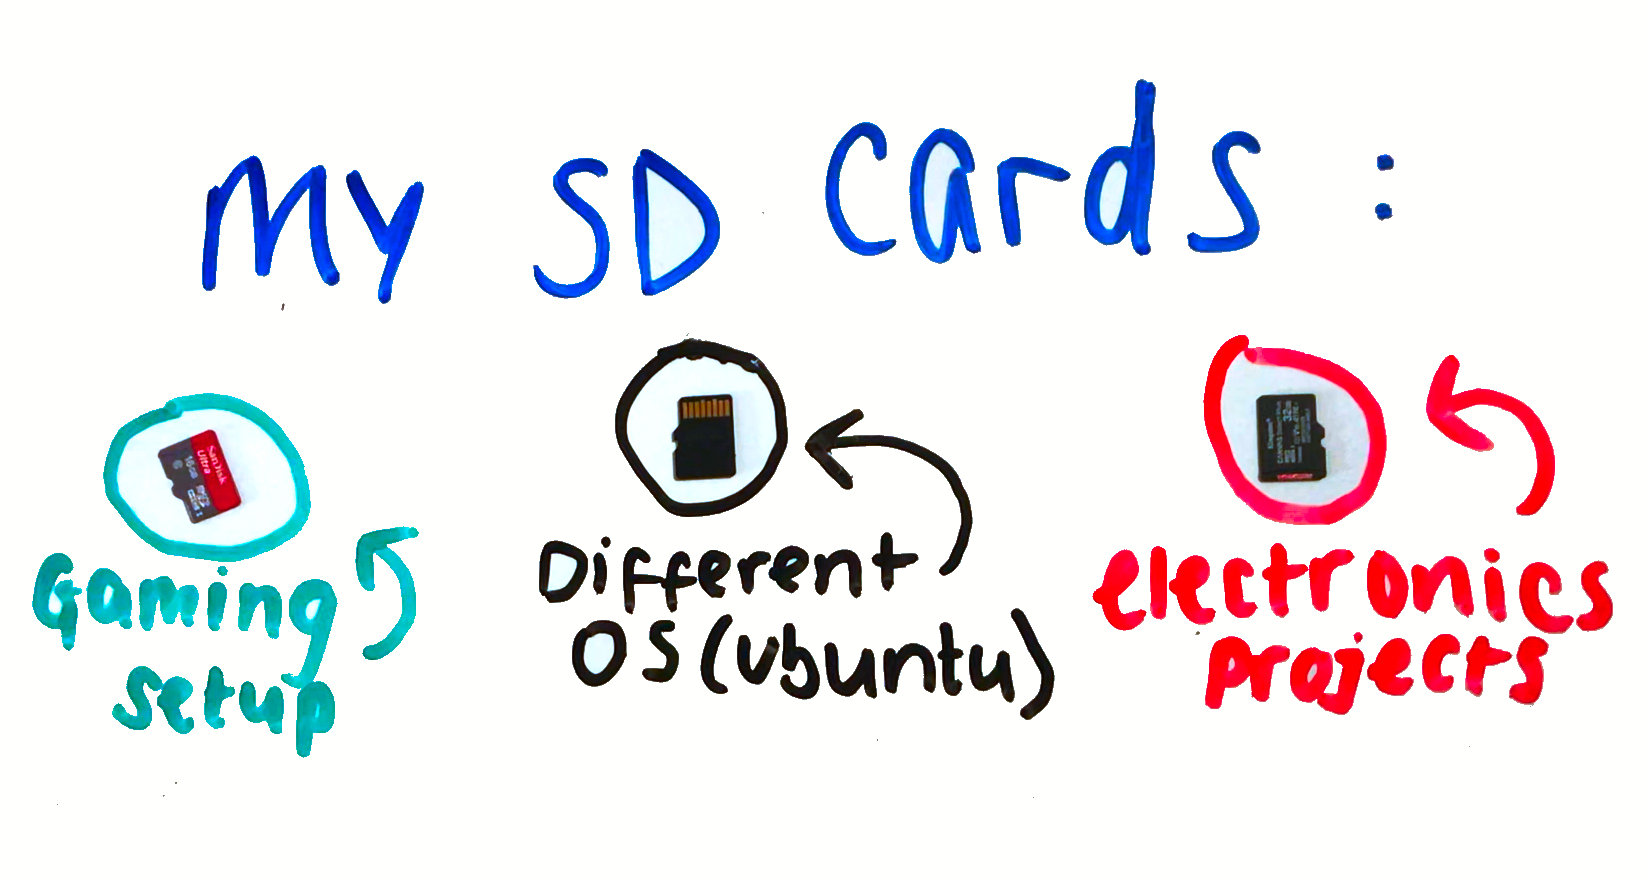
Computers like Raspberry Pi’s are really good for sharing, so multiple people can use the same computer but have different setups on their own individual SD cards.
Also maybe you, personally, want different setups like for personal, work, and gaming use so instead of buying a new Raspberry Pi, buy a new SD card.
Or you could just want fresh start and start new with a new operating system on either an old or new SD card.
Inserting the SD card
There are may reasons you may want to put a OS onto an SD card, but first you need an SD card and adapter to fit it into your device.
You can use another computer to burn the image onto your SD card, or check the next section if you want to use your Pi.
First, you will need to insert your SD card into your chosen device. If your computer does not have the correct shaped slot for your SD card, then you will need an adapter which are usually very easy to find. We have many lying about our house it here are a few options.
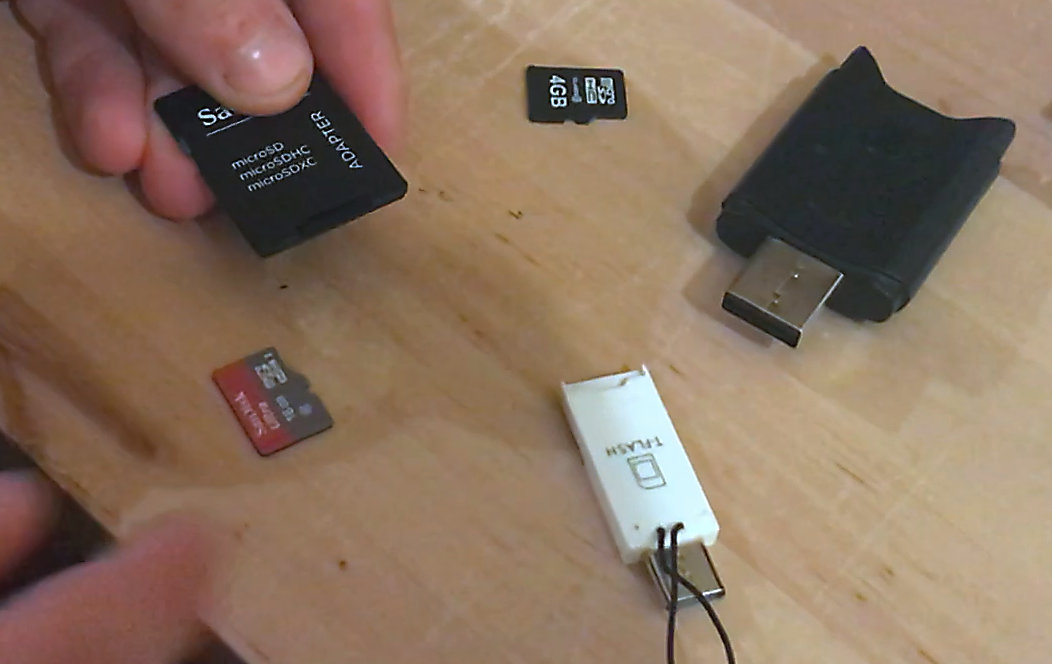
Our favourite is a nifty adaptor which takes a micro SD card and allows you to plug it into a USB A or USB C depending on which way you plug it in.
Another options is an SD card that allows you to plug a micro SD card into it. Some micro SD cards come with this adapter and plenty of devices have a standard SD card slot. Especially laptops.
We also have a USB device that will accept one of these adaptors in case your computer doesn't have an SD card slot.
Using a Raspberry Pi
It's a bit chicken and egg, but if you have a working OS on your Raspberry Pi you don't need another device to burn your new OS into a new SD card.
- First, you need to get the raspberry pi imager application. To do this, open a shell
If you are using Raspbian, press the small black squared icon with a blue top sort of imitating the shell found on the top menu bar.
sudo apt install rpi-imager
This will take a while to download and once it has downloaded, just follow the instructions given in the shell.
- Next, open up the application called imager - this will likely be found by pressing the raspberry in the top left corner then in the accessories option.
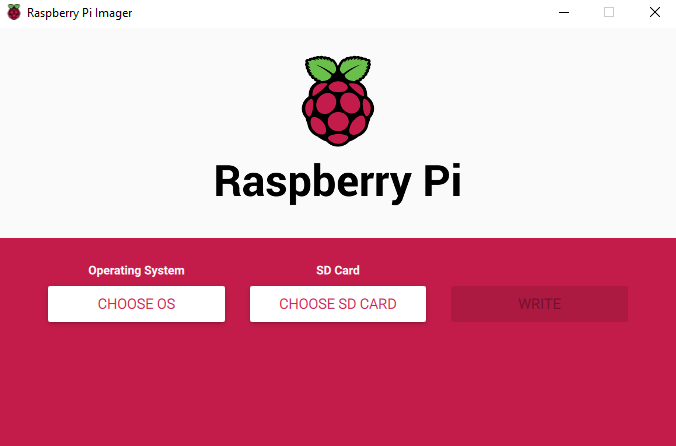
Once opened, press the button that says select SD card. Then select the SD card that you want to put the operating system onto. If there is more than one option, make sure to select the correct one since you could mess up your computer if you put another operating system onto the wrong SD card!
tip I knew my SD card was 32GB so I could tell the only 32GB option was my chosen SD card.
- Next press the choose OS option. Select the Operating system you would like to put onto your SD card and then you will have a few setup options so select the appropriate for you.
When choosing the operating system options bare in mind that selecting the no desktop environment option would be good if you are going for the headless Rasberry Pi setup but you won’t get all the cool applications, games and graphics etc…
-
Finally press Write. Just follow the instructions given to you, for example you may need to enter your user name and Password. After a while the download will be complete and the operating system will now be on your SD card!
-
Just take the SD card out of the SD card slot or adapter, insert it into the SD card slot on the bottom of your raspberry pi and boot up your Pi with it’s fresh, new operating system!
Using a Mac
-
First we need to get hold of the Raspberry Pi imager. To do this go here, and press the Raspberry Pi imager for macOS option.
-
Once it has finished downloading, you should be able to find the file on finder in Downloads. Now just mount it by double clicking on the file.
-
Next, just drag the big raspberry into downloads! (Like shown above)
Then we can launch the application and the icon for this application should be a large raspberry!
- Once opened, press the button that says select SD card. Then select the SD card that you want to put the operating system onto.
If there is more than one option, make sure to select the correct one since you could mess up your computer if you put another operating system onto the wrong SD card! In this example as seen in the image below, the other option is an external drive which has a lot of important information on so would be disastrous if we overwrote that - eeek!
tip Maybe take the SD card out, see if it disappears and then you can check for the correct one that way.
- Next press the choose OS option. Select the Operating system you would like to put onto your SD card and then you will have a few setup options so select the one appropriate for you.
When choosing the operating system options bare in mind that selecting the no desktop environment option would be good if you are going for the headless raspberry pi setup but you won’t get all the cool applications, games and graphics etc…
-
Finally press Write. Just follow the instructions given to you, for example you may need to enter your user name and Password. After a while the download will be complete and the operating system will now be on your SD card!
-
Just take the SD card out of the Mac, insert it into your Raspberry Pi, boot up your Pi and you should be good to go with your fresh, new operating system!
Using Windows
-
First we need to get hold of the Raspberry Pi imager. To do this go here, and press the Raspberry Pi imager for Windows option.
-
After downloading, the file will likely appear in the Downloads folder in files. Right Click, then press the run as administrator option.
-
After the download process has finished, launch the application we have just downloaded. For me, the application conveniently appeared on the bottom menu bar so I launched it. The icon should just look like a big raspberry!
-
Once opened, press the button that says select SD card. Then select the SD card that you want to put the operating system onto. If there is more than one option, make sure to select the correct one since you could mess up your computer if you put another operating system onto the wrong SD card! tip Maybe take the SD card out, see if it disappears and then you can check for the correct one that way.
-
Next press the choose OS option. Select the Operating system you would like to put onto your SD card and then you will have a few setup options so select the appropriate one for you.
When choosing the operating system options bare in mind that selecting the no desktop environment option would be good if you are going for the headless Rasberry Pi setup but you won’t get all the cool applications, games and graphics etc…
-
Finally press Write. Just follow the instructions given to you, for example you may need to enter your user name and Password. After a while the download will be complete and the operating system will now be on your SD card!
-
Now, just take the SD card out of your device, slot it into the SD card slot on your Raspberry Pi, boot up your Pi and your new operating system should now work on your Pi!
Using the Shell
If you have downloaded your OS image you can skip the first few steps as that's all we are doing.
- First go here. Normally, we would choose the Raspberry Pi OS (32 bit) and you can do that and still follow along. So you would press that Raspberry Pi OS (32 bit) option to download that file.
In this example we are going jazz things up and download Retro Pi.
- If you want to choose this option, or if you want an operating system that is no the Raspberry Pi OS, scroll down the page and under Third-party software press the download button on the OS option of your choice.
In this example we chose Retro Pi but apply these steps for you chosen OS.
-
Once selected we were bought to this page, so selected the download option on the top menu bar, scrolled down and pressed the Raspberry Pi 4/400 option since our device was a raspberry pi 400 so just select the option most appropriate to your setup and device.
-
Now, open or view your shell and you want to find the file we are currently downloading - it will most likely be in downloads so in the shell we type:
cd Downloads/
Then to see what is in Downloads type into the shell:
ls -al
Hopefully you should see your file that is currently downloading and if it ends in .crdownload that means it is still being downloaded.
- Make sure that the SD card you are putting the operating system on is NOT inserted to your device and in the shell type in the command:
lsblk -p
The command above just displays information about storage devices so can be used to identify the correct device name etc… and at the moment the SD card you are using to put the operating system on won’t be shown since it isn’t inserted.
- Now insert your SD card into your device, using an adapter if you need one and run the same command again:
lsblk -p
This time, there should be a new device displayed - that will be the SD card you have just inserted.
- Next, to unmount it type in the following command:
note - replace *** /dev/sda1 *** with the name of your SD card which will be under the NAME column in the shell after the last command typed in.
umount /dev/sda1
Now, if you type:
ls -al
You will see the file you have downloaded - if it’s finished downloading - is in red and ends in .gz
- To fix this you need to decompress the file by typing in the command:
note - replace retropie-buster-4.7.1-rpi4_400.img.gz with the name of the file you’ve just downloaded.
gunzip retropie-buster-4.7.1-rpi4_400.img.gz
Then again run:
ls -al
And you will see your file is no longer red and has decompressed.
- Now type in this command:
In the command, if stands for input file, so replace retropie-buster-4.7.1-rpi4_400.img with the name of the file you have. Also, in the command, of stands for the output file so you will want to change ***/dev/sda ***to the name of your SD card - unless yours has the same name!
sudo dd bs=16M if=retropie-buster-4.7.1-rpi4_400.img of=/dev/sda status=progress conv=f sync
We go through this command and explain it in more detail in the video linked at the top of this article.
-
Anyways after running this command, you may need to wait a small while until it has finished running and your new fresh operating system should now be on your SD card.
-
Now, just take the SD card out of your device, slot it into the SD card slot on your Raspberry Pi, boot up your Pi and your new operating system should now work on your Pi!
We'll update this article as the technology updates so do please reach out if you notice anything missing in this guide.

