projects
Build Your Own Pico Piano: A DIY Electric Piano Project with a Raspberry Pi Pico
Build your own miniature keyboard using a Raspberry Pi Pico microcontroller, a breadboard, and a few resistors. This project costs about the price of a high street hot chocolate and muffin, it's easy to complete, and lots of fun.
Simple Pocket Money Version - just a cheap pico, speaker and resistors.
Take your DIY and maker skills to the next level by etching your own keyboard for this project using Sharpies - check out our separate article for step-by-step instructions.
- What You Need
- Video
- Principle
- Circuit
- Tweak The Code For Your Setup
- Video
- Getting Hold Of The Code
- Inputting Your GPIO Values
- Run The Code For The First Time
- Picking Notes That Sound Good
- Setting Up The Notes
- Finishing Up
- Getting rid of the delay
- Take It A Step Further
What You Need
For this article you will need:
- Resistors
- Some wire
- Raspberry Pi Pico (or any other microcontroller like the Tiny2040)
- Mini speaker
- Solder & Soldering Iron (optional)
Video
Principle
Feel free to skip this section if you are eager to build your piano.
The principle behind this project is a voltage divider, which is a circuit that uses resistors to divide a voltage into two separate voltages. The ratio of the resistors determines how the voltage is divided. In this project, we will use a microcontroller and code to detect the voltage division created by the resistors.
If you'd like a deeper understanding of this principle, check out our separate article and video on the topic.
Circuit
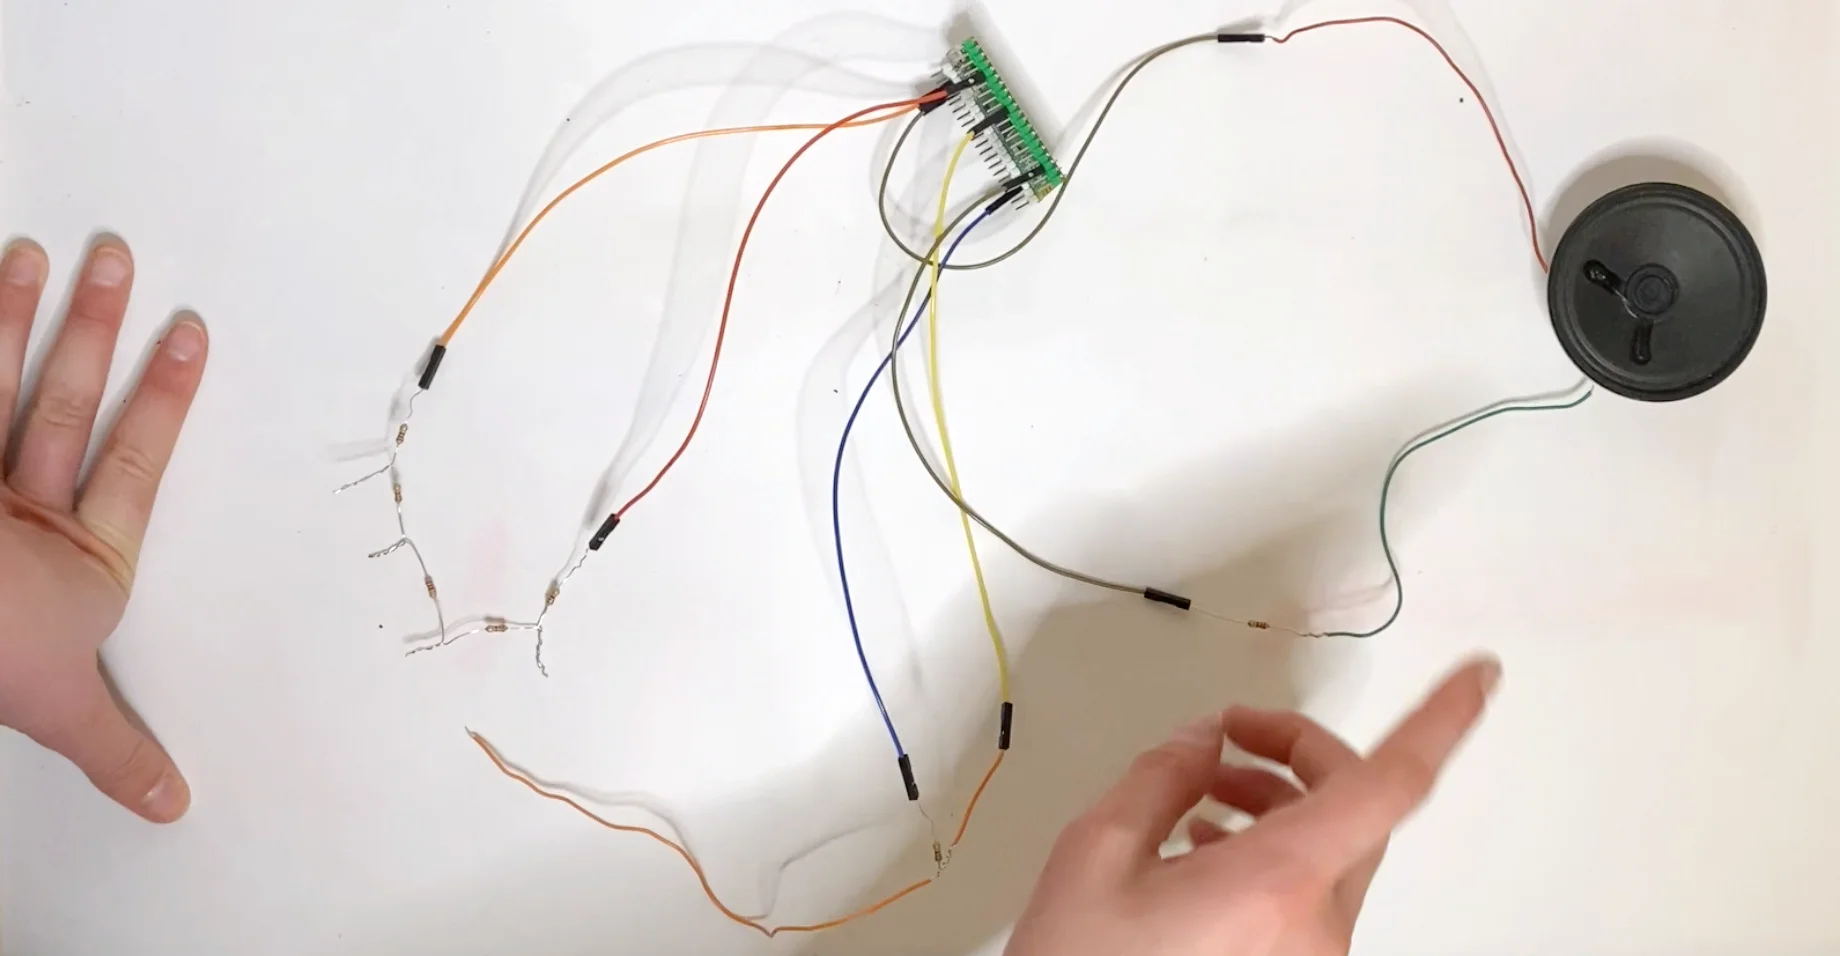
In this step, you will need your Raspberry Pi Pico microcontroller, the resistors, and a wire.
Resistor string
The resistors will be connected in series, with one end of each resistor connected to the other end of the previous resistor. The end of the first resistor will be connected to ground, and the end of the last resistor will be connected to 3v3 power on your microcontroller.
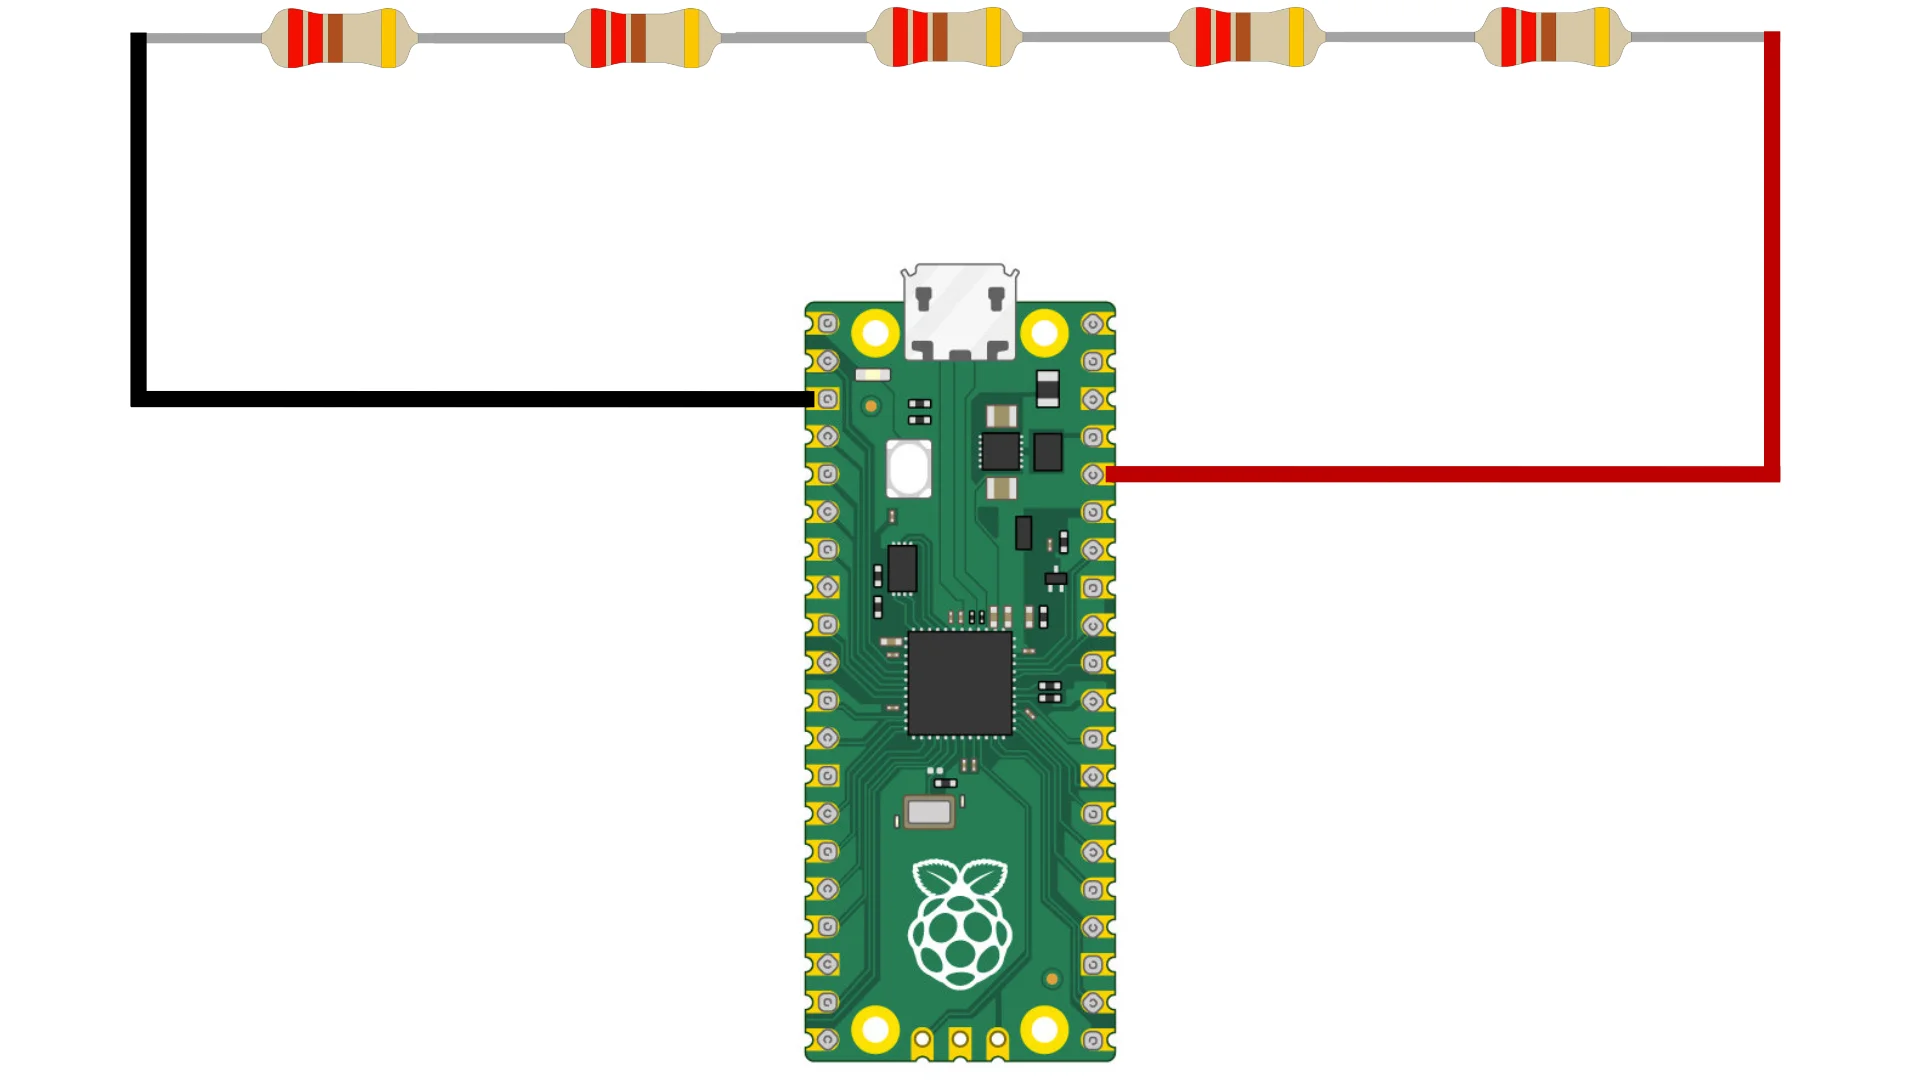
You can either solder the resistors together or twist the ends together.
The voltage at each junction between resistors will be different. By adding a wire from an analog pin and touching the wire at different junctions we can measure the voltage.
With some simple code, we can play a specific frequency through a speaker depending on the voltage we measured.
For example, if the voltage is 2 volts we could play a different note than if the voltage was 3 volts.
By repeating this process for all points between the resistors, we can create a working piano.
More resistors, more notes. Although there will be a limit because the voltage will fluctuate a little and at some point, it won't be possible to discern one junction from another.
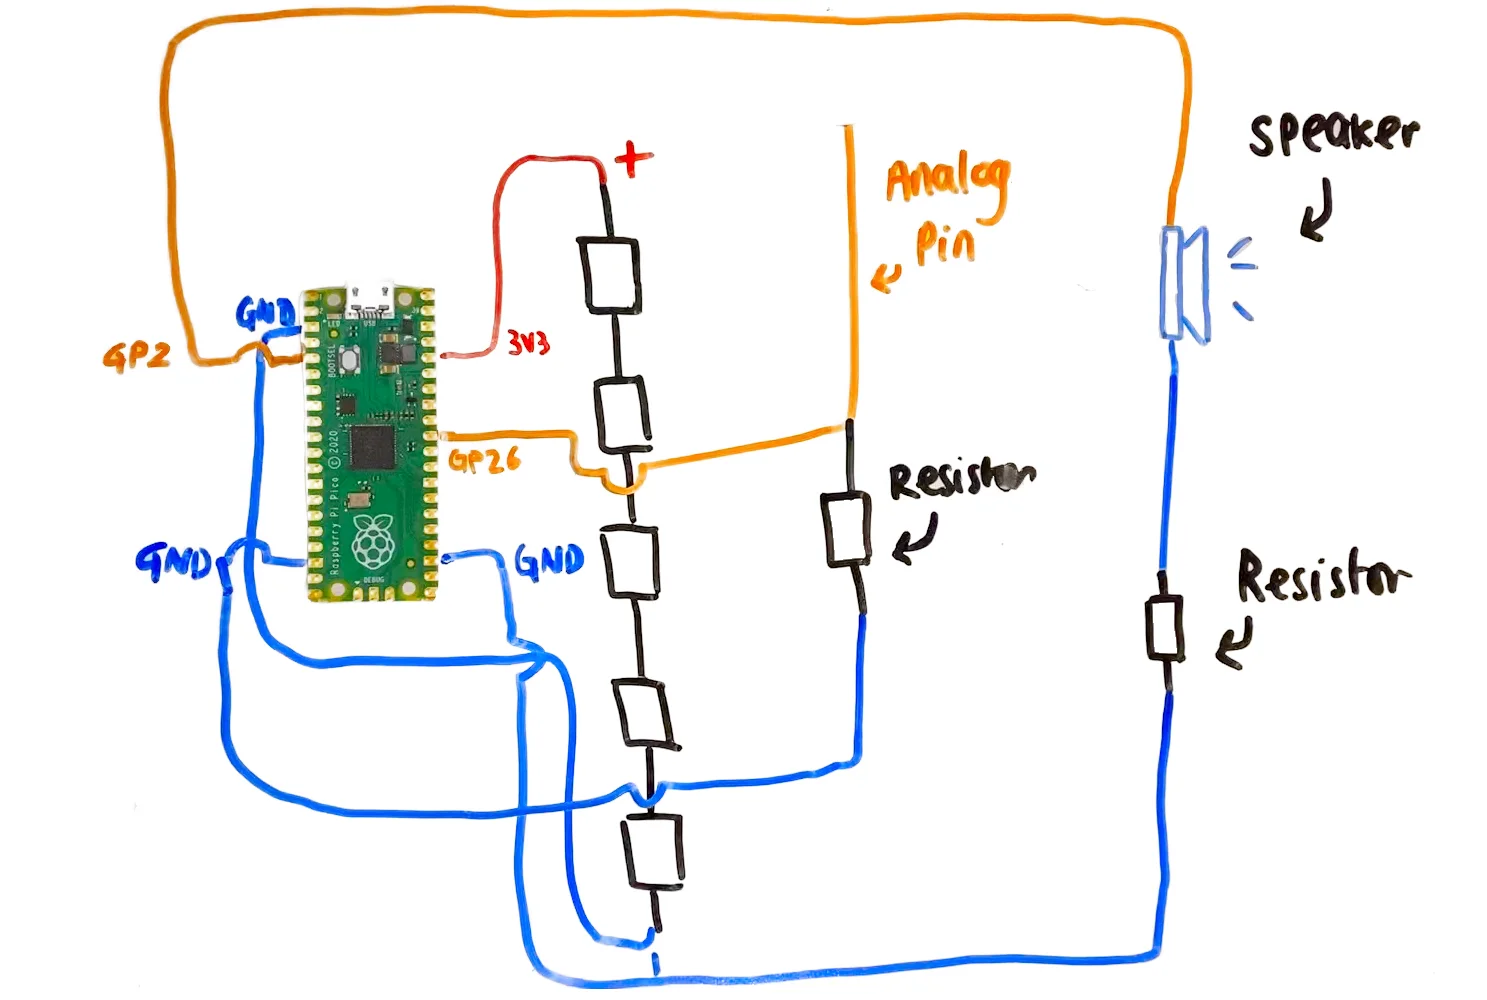
Adding The Probe Wire
Add a wire to an analog GPIO pin on your microcontroller. We chose GPIO pin 26. This wire is what we use to touch the resistors and measure the resistance. In other words, playing the piano.
We found a note would be played sometimes even if the wire wasn't touching a junction.
We added a resistor between the wire and ground to pull the voltage down to zero when it wasn't touching a junction.
This is shown in the full circuit diagram shown a bit below in the article.
Speaker
Finally, we need to add a speaker for sound. Simply connect the negative of the speaker to ground on your microcontroller & the positive terminal of the speaker or buzzer to a GPIO pin.
We chose GPIO pin 2 and we also put a resistor between the speaker and ground to prevent the speaker from drawing too much current. We aren't sure this is really necessary we've never broken a board when we've skipped this resistor.
Full Circuit Diagram
Tweak The Code For Your Setup
To accommodate a variety of preferences, we wrote the code in both CircuitPython and MicroPython.
Although there are some slight differences between the two versions, the overall structure and functionality of the code is largely the same
Video
We have a great youtube video on setting up your pico piano with the code here, or you can continue with this article.
Getting Hold Of The Code
You can download all our code on our Github or copy and paste it from this article below.
First, you need to have the following code saved on your microcontroller as note_utils.py.
def note_to_midi(note):
    name = note.rstrip("0123456789-")
    octave = int(note[len(name):])
    note_to_num = {
        "C": 0,
        "C#": 1,
        "D": 2,
        "D#": 3,
        "E": 4,
        "F": 5,
        "F#": 6,
        "G": 7,
        "G#": 8,
        "A": 9,
        "A#": 10,
        "B": 11
    }
    midi = octave*12+note_to_num[name]+12
    return midi
################################################################################

def midi_to_freq(midi_num, should_round = False):
    distance = midi_num-69
    freq = 440*2**(distance/12)
    if should_round:
        return round(freq)
    return freq
################################################################################

def note_to_freq(note, should_round = False):
    midi = note_to_midi(note)
    return midi_to_freq(midi, should_round)
We import this code into our main program since it has all the functions we use in it. We wrote the functions in a different file to make the code cleaner. You don't have to edit this file at all.
We will show you how to edit our code to fit your setup as every piano will be unique.
There will be a delay in the sound sounding from when you hit the key or resistor while we set up but I will show you how to get rid of the delay at the end.
Below is the code you will start with. Please choose the version that is written in the programming language you prefer: CircuitPython or MicroPython.
CircuitPython Code:
import board
import pwmio
import time
from analogio import AnalogIn

import note_utils

probe_pin = board.GP26_A0
speaker_pin = board.GP18
probe = AnalogIn(probe_pin)
speaker = pwmio.PWMOut(speaker_pin, frequency=440, duty_cycle=0, variable_frequency=True)


min_probe_val = 1500
e_minor = [[8000, "E4"], [13000, "G4"], [19000, "A4"], [30000, "B4"], [66000,"D5"]]
diatonic = [[2500,"C4"],[3000,"C#4"],[3600,"D4"]]

def update_tone(probe_limit_freq_list, debug = False):
    probe_value = probe.value
    if debug:
        time.sleep(1)
        print(probe_value)
    if probe_value < min_probe_val:
           speaker.duty_cycle = 0
           return
    for probe_limit_freq_pair in probe_limit_freq_list:
        if probe_value < probe_limit_freq_pair[0]:
            speaker.duty_cycle = int(65535/2)
            speaker.frequency = probe_limit_freq_pair[1]
            return

def note_to_freq_list(probe_limit_note_list):
    probe_limit_freq_list = []
    for probe_limit_note_pair in probe_limit_note_list:
        temp_pair = []
        temp_pair.append(probe_limit_note_pair[0])
        temp_pair.append(note_utils.note_to_freq(probe_limit_note_pair[1],True))
        probe_limit_freq_list.append(temp_pair)
    return probe_limit_freq_list

loaded_list = note_to_freq_list(e_minor)
print(loaded_list)

while True:
    update_tone(loaded_list,True)
MicroPython Code:
import machine
import utime as time
import note_utils

probe_pin = 26
speaker_pin = 2
probe = machine.ADC(probe_pin)
speaker = machine.PWM(machine.Pin(speaker_pin))

min_probe_val = 2000
e_minor = [[8000, "E4"], [13000, "G4"], [19000, "A4"], [30000, "B4"], [66000,"D5"]]
diatonic = [[2500,"C4"],[3000,"C#4"],[3600,"D4"]]

def update_tone(probe_limit_freq_list, debug = False):
    probe_value = (probe.read_u16())
    if debug:
        time.sleep(1)
        print(probe_value)
    if probe_value < min_probe_val:
           speaker.duty_u16(0)
           return
    for probe_limit_freq_pair in probe_limit_freq_list:
        if probe_value < probe_limit_freq_pair[0]:
            speaker.duty_u16(int(65535/2))
            speaker.freq(probe_limit_freq_pair[1])
            return

def note_to_freq_list(probe_limit_note_list):
    probe_limit_freq_list = []
    for probe_limit_note_pair in probe_limit_note_list:
        temp_pair = []
        temp_pair.append(probe_limit_note_pair[0])
        temp_pair.append(note_utils.note_to_freq(probe_limit_note_pair[1],True))
        probe_limit_freq_list.append(temp_pair)
    return probe_limit_freq_list

loaded_list = note_to_freq_list(e_minor)
print(loaded_list)

while True:
    update_tone(loaded_list,True)
Inputting Your GPIO Values
In both the CircuitPython and MicroPython code, you will need to replace certain pin numbers with the ones that correspond to your specific board.
In the CircuitPython code on lines 8 and 9, where it says
probe_pin = board.GP26_A0
speaker_pin = board.GP18
replace the numbers 26 and 18 with the analog pin and speaker PWM pin that you are using.
In the MicroPython code on lines 5 and 6, where it says:
    probe_pin = 26
    speaker_pin = 2
replace the numbers 26 and 2 with the analog pin and speaker PWM pin, that you are using.
Run The Code For The First Time
Now you are ready to run the code for the first time, and you'll need to take notes.
We use Thonny you don't have to but you will need to be able to read the output as the code will print a number relating to the voltage every second.
Grab your probe but don't touch it to the circuit yet, you want to get an idea of the maximum value when it's not connected.
The idea is below this number there will be no sound, ours hovered at about 1400 it got higher and lower but never went over 1500 so this is the value we used. You set yours accordingly.
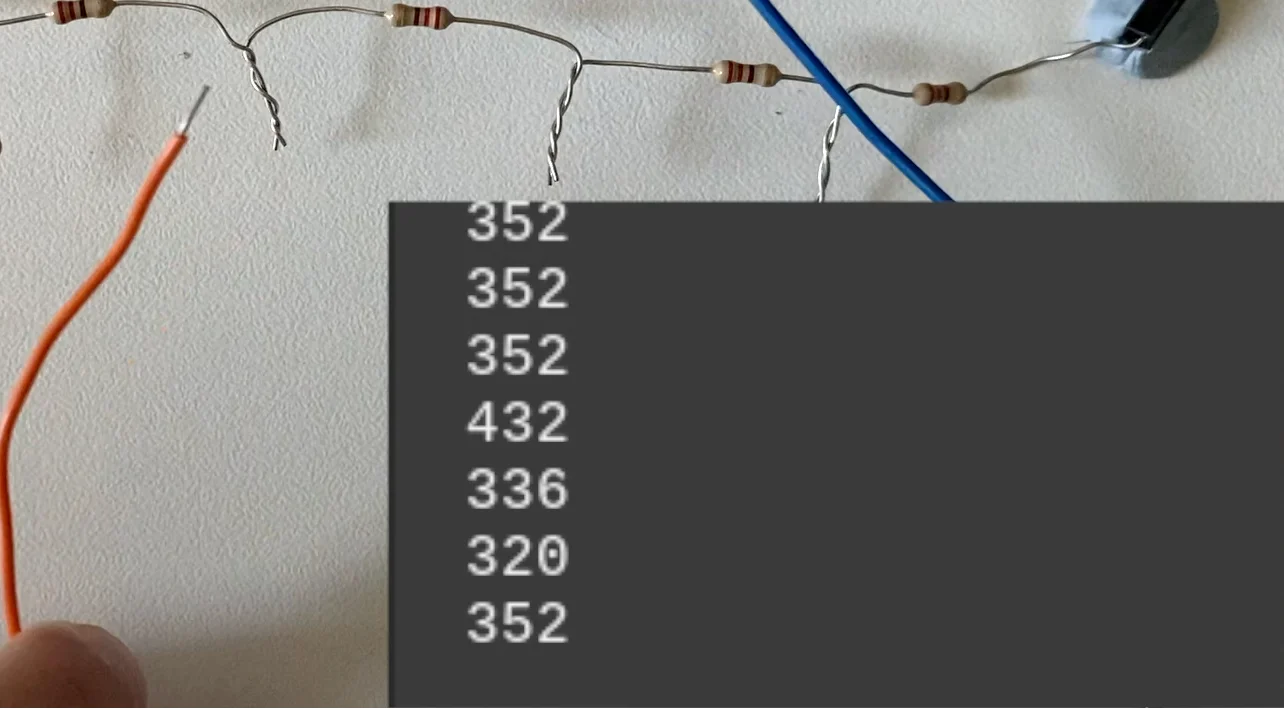
In this case, 432 is the highest so we would probably put 500 since it doesn't go over 500. Be careful your values don't overlap!
On line 14, where it says:
min_probe_val = 1500
Replace 1500 with the highest number it prints when your probe isn't touching any key/resistor!
Picking Notes That Sound Good
On lines 15 and 16 in CircuitPython and lines 11 and 12 in Micro Python, where it says:
e_minor = [[8000, "E4"], [13000, "G4"], [19000, "A4"], [30000, "B4"], [66000,"D5"]]
diatonic = [[2500,"C4"],[3000,"C#4"],[3600,"D4"]]
The e_minor list contains notes that sound good together, but you can also create your own list with custom notes.
If you are making this for someone non-musical the e minor pentatonic we included will sound great in whatever order the notes are played in.
You can jam along to Hey Joe by Jimmi Hendrix. It's fun and builds confidence although if there is a song you want to play there may be notes missing from that song.
If you have 12 junctions you have the space for all the notes in an octave. This is good if you are musical or want to play a particular melody.
The top list has 5 notes and the bottom list has 3 notes.
Setting Up The Notes
When editing or making your own list here is the format you should follow:
list_name = [[probe_value, "note_name"], [probe_value, "note_name"], etc]
The note_name is the note to be played, and the probe_value we'll show you how to get shortly.
list_name is the name of your new variable for your new list. You could create multiple lists to have different options for the same keyboard.
Next, you touch your probe at the junction for the next note. Always start from the end with the lowest probe value.
Take note of the probe value which will fluctuate around a certain range and pick the highest number and add a little margin too.
In the instance below a good probe value for the note would be 12500 because the highest number was 12242 and we have to have some room for fluctuation.
remember, don't let your probe values overlap!
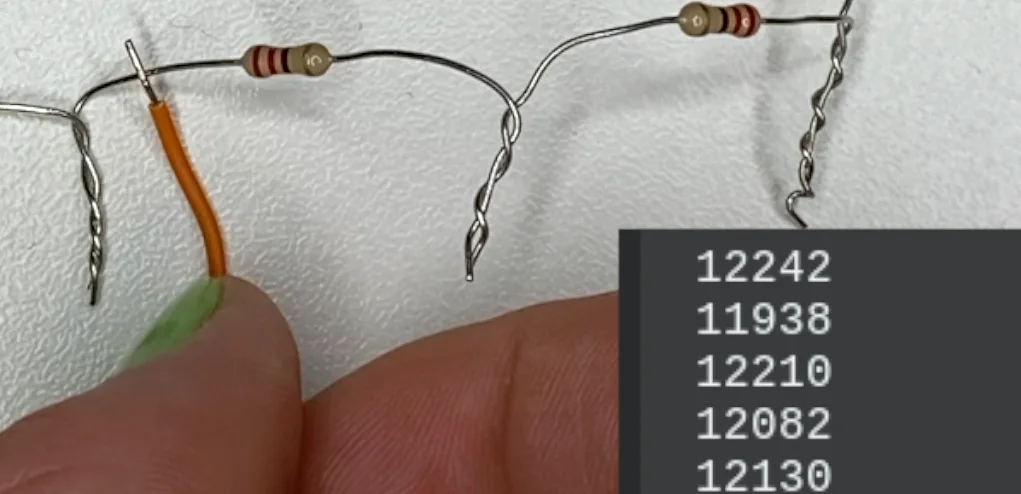
Make sure the program is running so you can get these readings
To be sure you could move on to the next note and look at the values there and pick a number between the highest of the note you are on and the lowest of the next note.
The "note_name" is a string formatted as "C4", for example, where the number represents the octave and the letter represents the note itself (A, F#, C, etc.).
Below is an example you could use, it follows on from the e_minor list above but another note is added due to this piano having 6 notes, not 5.
We added [112000, "E5"] to the end of the list.
e_minor_new = [[8000, "E4"], [13000, "G4"], [19000, "A4"], [30000, "B4"], [66000, "D5"],[112000, "E5"]]
Finishing Up
Now you should have a new variable with your list of notes, and probe values to suit your setup.
To get it to use your new list change this line in the code replacing the e_minor with the name of your new list.
loaded_list = note_to_freq_list(e_minor)
Something like this.
loaded_list = note_to_freq_list(e_minor_new)
Getting rid of the delay
Finally, find this line:
update_tone(loaded_list,True)
Change True to False after setting up to get rid of that delay.
update_tone(loaded_list,False)
Now you're all done! You may need to tweak your circuit and code to get it playing just right.
Take It A Step Further
There is a lot of scope to modify this code but we wanted to keep it clear and short. For example, you could add a button to change octave or note mapping which just circles through your lists of notes.
Record Songs
You could record the song and play it back, just add a button to start and stop the recording with perhaps an LED to flash when recording. Take a snapshot of the time and then you'll know when the notes were played by comparing the time to the snapshot. You could record either the probe value or the note in a list along with the delay.
You could have memory banks and display them on an OLED or E-Ink display.
Add Midi
We added MIDI using the Circuit Python version we converted the note to a midi value and sent it out over USB to garage band on an iPad and iPhone.
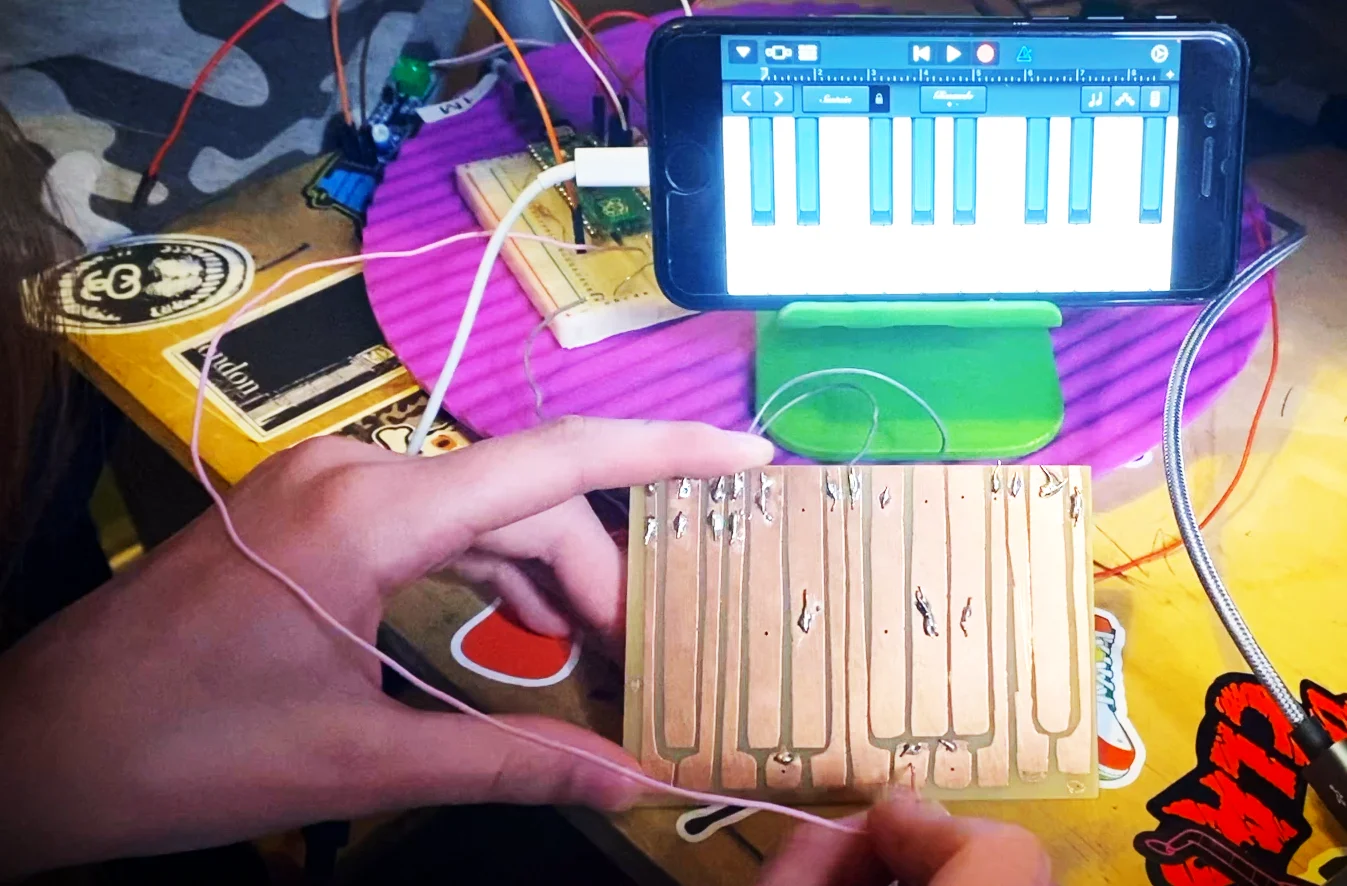
Physical Keyboard
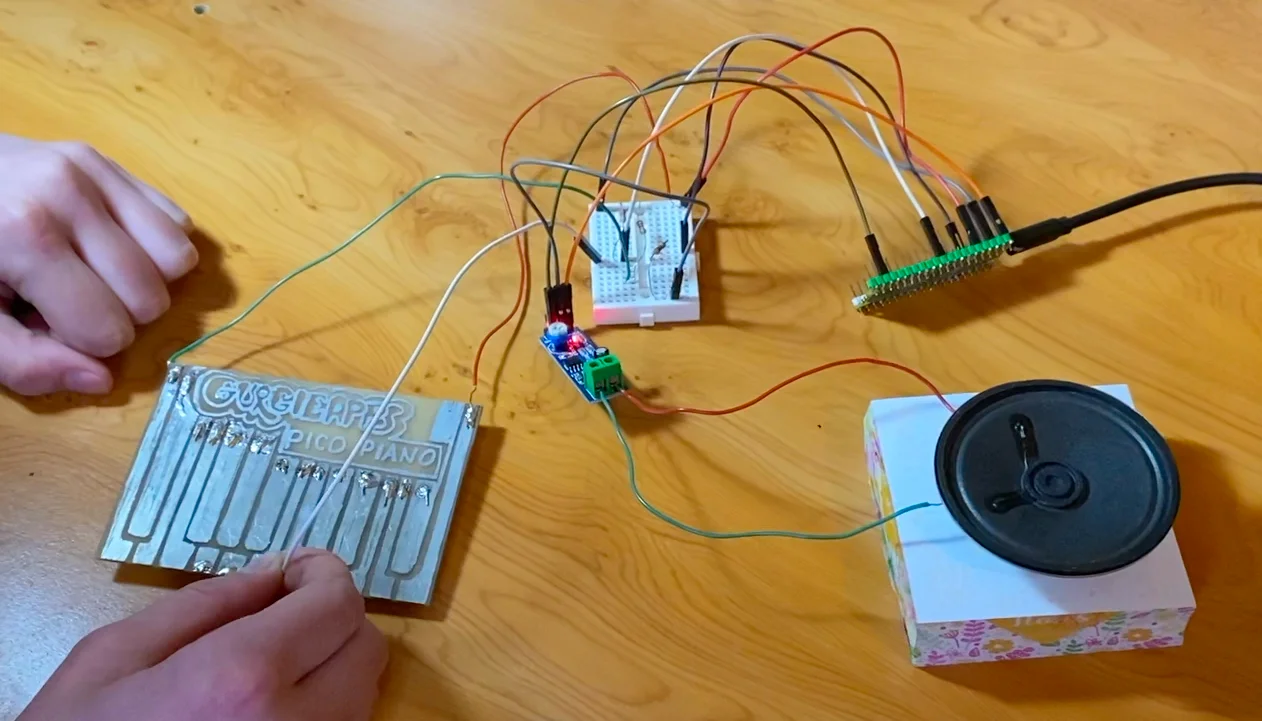
We etched physical keyboards for our piano circuit and code, much easier than you'd think.
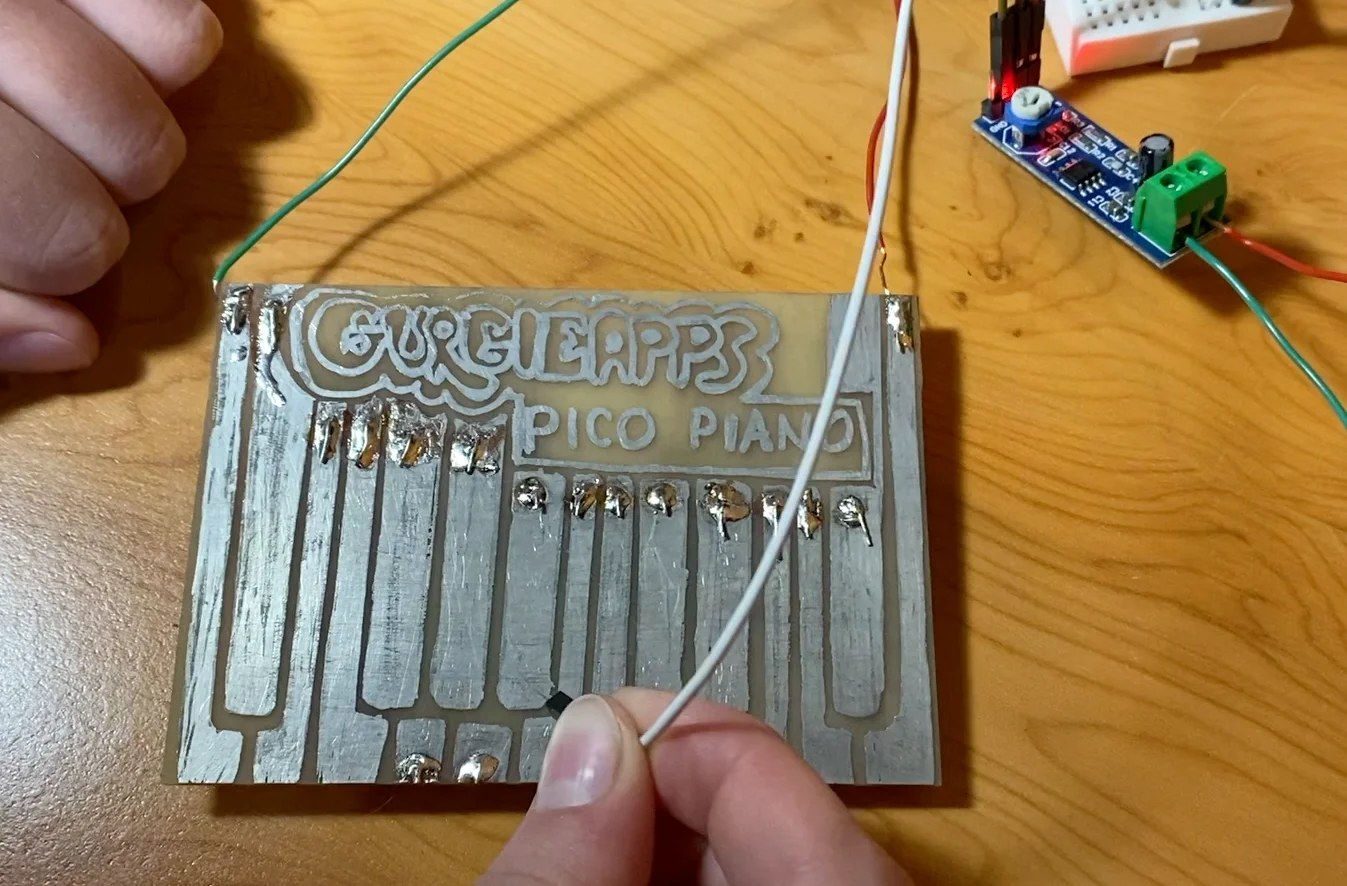
Amplify
A great project is an Amp we have an article on building our own Guitar Amp. We built the circuit for learning but you can get a cheap pre-made amp with volume control.
The photo above with the physical keyboard shows the amp we used an LM386.
Any questions contact us via our contact form